How to Read Guitar Chord Diagrams: A Beginner's Guide

Introduction
If you've just started learning guitar, you've probably come across chord diagrams in lessons, books, or online tutorials. At first glance, they can look confusing—but once you understand how they work, you'll be able to learn new chords quickly and confidently.
A chord diagram is simply a visual map of the guitar neck. It shows you exactly where to place your fingers to play a chord. Better yet, once you know how to read one diagram, you'll be able to understand thousands of others.
In this guide, we'll break down each part of a chord diagram so you can start reading them with confidence.
What Is a Chord Diagram?
A chord diagram is a picture of the guitar's fretboard viewed from the front, as if the guitar were standing upright in front of you.

It tells you:
Which strings to play
Which strings to avoid
Which frets to press
Which fingers to use (sometimes)
Think of it as a map that guides your hand into the correct position.
Understanding the Strings
The vertical lines represent the six strings of the guitar.

From left to right, they are:
E – A – D – G – B – E
The string on the far left is the 6th string (low E).
The string on the far right is the 1st string (high E).
Understanding the Frets
The horizontal lines represent the frets.

The top horizontal line is the nut (or the first fret marker if the chord is played farther up the neck).
Each space between the horizontal lines represents one fret.
If a dot appears in the second space, you press the second fret.
If it appears in the third space, you press the third fret, and so on.
What Do the Dots Mean?
The black dots show where your fingers should press the strings.

Each dot tells you:
Which string
Which fret
For example:
A dot on the first string at the third fret means:
Press the 1st string at the 3rd fret.
If there are multiple dots, press all of those notes at the same time to form the chord.
What Do the X and O Mean?
At the top of many chord diagrams you'll see either:

O (Open)
or
X (Muted)
O = Play the Open String
An open circle means:
Play this string without pressing any fret.
Open strings are an important part of many beginner chords.
X = Don't Play This String
An X means:
Do not play this string.
Some chords require you to avoid certain strings so the chord sounds correct.
As you become more experienced, you'll learn techniques for muting these strings with either hand.
What Do the Numbers Mean?
Some chord diagrams include numbers above the chart or inside the dots.

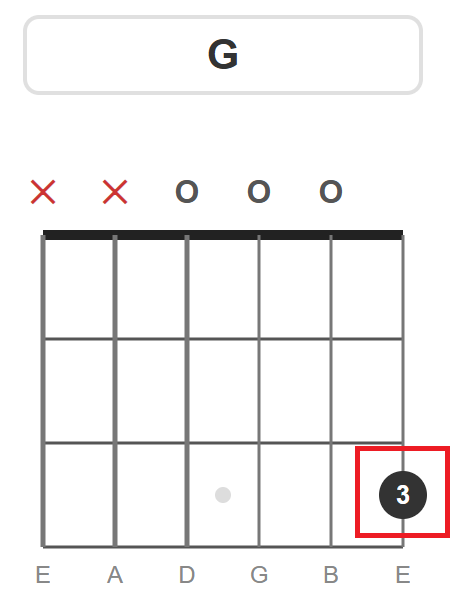
These indicate which finger to use.
Generally:
1 = Index finger
2 = Middle finger
3 = Ring finger
4 = Pinky

Using the suggested fingering helps make chord changes smoother and prepares you for future chords.
What If the Diagram Starts Above the Nut?
Not every chord is played near the headstock. Some chords are played higher up the neck, so the chord diagram won't show the nut. Instead, you'll see a fret number beside or above the diagram, such as 5, 7, or 10.
This number indicates the position where the chord begins.

For example, if a chord diagram starts at the 5th fret, the chord is played in 5th position. In other words, the top horizontal line of the diagram represents the 5th fret, and the frets below it represent the 6th, 7th, and 8th frets.
Everything else about the diagram is read exactly the same way—you'll still use the vertical lines for the strings, the horizontal spaces for the frets, and the dots to show where your fingers should be placed.
Understanding positions is an important step toward navigating the entire fretboard, especially as you begin learning barre chords, movable chord shapes, and more advanced voicings.
Common Beginner Mistakes
When reading chord diagrams, beginners often:
Read the strings backwards.
Ignore the X and O symbols.
Press directly on the
fret instead of just behind it.
Use the wrong fingers.
Forget to check whether every note rings clearly.
Taking a few extra seconds to understand the diagram before playing often leads to much better results.
Practice Reading Chord Diagrams
The best way to become comfortable with chord diagrams is to use them regularly.
Choose a few beginner chords and practice:
Identify each string.
Find the correct fret.
Place your fingers.
Strum each string slowly.
Check that every note rings clearly.
After a little practice, reading chord diagrams will become second nature.
What's Next?
Now that you know how to read a chord diagram, it's time to start building your chord vocabulary.
Continue with these beginner lessons:
Play Your First Guitar Chords
Common Beginner Chord Mistakes
How to Switch Chords Smoothly
The more chords you learn, the more songs you'll be able to play.
Final Thoughts
Learning to read chord diagrams is one of the most valuable skills a beginner guitarist can develop. They're used in countless books, websites, and lessons, making them a universal language for guitar players.
Rather than memorizing individual chord shapes, take the time to understand how chord diagrams work. Once you can read them confidently, you'll be able to learn new chords, explore new songs, and continue growing as a musician for years to come.
At Four on Six Music, our goal is to help you understand not only where to put your fingers, but also why the music works. Mastering chord diagrams is one more step toward becoming an independent and confident guitarist.


Comments