How to Read Guitar TABs: A Beginner's Guide

Updated: Jul 20
Introduction
When you're learning guitar, you'll quickly encounter a type of notation called guitar tablature, or TABs.
Unlike traditional sheet music, guitar TABs are designed specifically for guitar players. It shows you exactly where to place your fingers on the fretboard, making it one of the easiest ways for beginners to start learning riffs, melodies, and songs.
The great thing about TABs is that you don't need to know how to read traditional music notation to begin playing. Once you understand the basics, you'll be able to follow thousands of guitar lessons and learn music more independently.
In this guide, we'll break down how guitar TABs work, explain the symbols you'll encounter, and show you how to start reading it with confidence.
What Are Guitar TABs?
Guitar tablature is a system of writing music that shows the strings and frets of the guitar.
Instead of showing the names of notes, TABs show you:
Which string to play
Which fret to press
The order of notes
Techniques used by the guitarist
Think of TABs as a visual map of the guitar neck.
Understanding the Six Lines of Guitar TABs
The first thing to understand is the six horizontal lines.
Each line represents one string of the guitar.
Unlike chord diagrams, TABs are read with the lowest string at the bottom and the highest string at the top.
From top to bottom:
Example 1: This is how you will see TABs on webpages such as Ultimate Guitar
e|----------------
B|----------------
G|----------------
D|----------------
A|----------------
E|----------------
Example 2: This is how you will see TABs on webpages such as Songster:

The top line represents the high E string (1st string).
The bottom line represents the low E string (6th string).
A helpful way to remember this is:
The TAB looks like you're looking down at your guitar while playing it.
Understanding Numbers in TABs
The numbers placed on the lines represent the frets you play.
For example:
e|----------------
B|----------------
G|----------------
D|----------------
A|---3------------
E|----------------
This means:
Play the 5th string (A string)
Press the 3rd fret
Play that note
A 0 means play an open string.
Example:
e|----------------
B|----------------
G|----------------
D|----------------
A|---0------------
E|----------------
The A string is played without pressing any fret.
Reading TABs From Left to Right
Guitar TABs are read the same way you read a sentence:
From left to right.
The notes on the left are played first, followed by the notes to the right.
Example:
e|----------------
B|----------------
G|----------------
D|----------------
A|---0---2---3----
E|----------------
You would play:
Open A string
2nd fret A string
3rd fret A string
The spacing between numbers can sometimes indicate timing, but TABs usually rely on standard rhythm notation or a recording to show the exact rhythm.
Playing Multiple Notes at the Same Time
When numbers appear stacked vertically, they are played together.
Example:
e|---3---
B|---0---
G|---0---
D|---0---
A|-------
E|-------
This represents a G chord shape.
Multiple notes stacked together usually indicate:
Chords
Double stops
Harmonized parts
Common Guitar TAB Symbols
TABs often use symbols to show guitar techniques.
Hammer-On (h)
Example:
5h7
Play the 5th fret, then hammer your finger onto the 7th fret without picking again.
Pull-Off (p)
Example:
7p5
Play the 7th fret, then pull your finger off to sound the 5th fret.
Slide (/ or )
Example:
5/7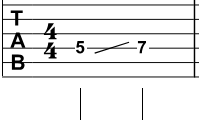
Play the 5th fret and slide up to the 7th fret.
Bend (b)
Bends are one of the most expressive techniques on guitar. Instead of simply playing a note, you raise the pitch by pushing or pulling the string until it reaches a higher note.
In TABs, bends can be written in several different ways depending on the source.
Fret-to-Fret Bend Notation
A bend may be written like this:
7b9This means:
Play the note at the 7th fret.
Bend the string until it reaches the pitch of the 9th fret.
The "9" does not mean you move your finger to the 9th fret. It indicates the target pitch you should reach while bending.
Bend Amount Notation
Another common way to write bends is with an arrow and the amount of the bend:

This means:
Start at the 7th fret.
Bend the string up a whole step.
A whole step equals 2 frets of pitch.
So the note at the 7th fret should sound like the note at the 9th fret when the bend reaches its destination.
Understanding Bend Measurements
You may see different measurements that indicate how far to bend the note:
1/2 = half-step bend (raise the pitch by 1 fret)
1 = whole-step bend (raise the pitch by 2 frets)
1 1/2 = one-and-a-half step bend (raise the pitch by 3 frets)
For example:
7 ↑1/2means bend the 7th fret note up one fret in pitch.
7 ↑1means bend the 7th fret note up two frets in pitch.
7 ↑1 1/2means bend the 7th fret note up three frets in pitch.
How to Practice Bends
The goal of a bend is not just to move the string—it is to reach the correct pitch.
A good way to practice:
Play the target note first.
Listen carefully to its pitch.
Return to the original note.
Bend until you match the target pitch.
For example, to practice a whole-step bend at the 7th fret:
Play the 9th fret note.
Listen to the pitch.
Play the 7th fret.
Bend until it sounds the same as the 9th fret.
Developing accurate bends takes time, but it is one of the techniques that gives guitar its unique expressive voice.
Vibrato (~)
Example:
7~
Add a slight movement to the note to create a wavering sound.
Palm Muting (PM)
Example:
PM ----
Rest your picking hand lightly near the bridge to create a muted sound.
Do TABs Show Rhythm?
One important thing to understand is that TABs by themselves don't always show rhythm clearly.
A number tells you:
What note to play.
It does not always tell you:
How long to play it.
Many TAB examples include rhythm notation above the TABs, or you can listen to the original recording to understand the timing.
Developing your sense of rhythm is just as important as knowing where to place your fingers.
Common Beginner TABs Mistakes
When learning to read TABs, beginners often:
Forget which string each line represents.
Play the wrong fret.
Ignore rhythm.
Play too fast.
Focus only on notes instead of technique.
Remember that TABs are a tool for learning music—not a replacement for understanding how music works.
TABs vs. Standard Music Notation
Both systems have advantages.
TABs are helpful because:
It shows exactly where to play.
It's easy for beginners.
It works well for guitar-specific techniques.
Standard notation is helpful because:
It shows rhythm more clearly.
It applies to all instruments.
It develops deeper musical understanding.
Many great guitarists use both systems depending on the situation.
How to Practice Reading TABs
Start with simple exercises:
Find the correct string.
Locate the correct fret.
Play slowly and accurately.
Focus on rhythm.
Gradually increase speed.
Begin with simple melodies and riffs before moving to complex songs.
What's Next?
Now that you understand how to read guitar TABs, you have one of the essential skills needed to learn songs and exercises on guitar.
Continue building your foundation with:
Play Your First Guitar Chords
Learn Your First Guitar Songs
Beginner Guitar Practice Routine
The more you practice reading TAB, the easier it becomes to learn new music independently.
Final Thoughts
Guitar TABs are one of the most useful tools a beginner guitarist can learn. It opens the door to countless songs, riffs, exercises, and musical ideas.
But remember—TABs are only part of becoming a complete musician. The goal isn't just to know which fret to press; it's to understand the sounds you're creating and why the music works.
At Four on Six Music, we believe learning guitar is about developing both your technique and your understanding of music. TABs are one more tool that helps you become a more confident and independent player.


Comments